


How declarative UI compares to imperative
Designing user interface interactions probably includes thinking about how the UI changes based on user actions. An example of an answer form would be:
When you type something into a form, the “Submit” button becomes enabled. If the network request succeeds, the form gets hidden, and the “Thank you” message appears.
An imperative program implements interaction in the same way as the above. Depending on what just happened, you need to write the exact instructions on how to manipulate the UI.
Example : Riding next to someone in a car and telling them turn by turn where to go. They don't know where to go, they just follow your commands.

As the name suggests, imperative means that you have to "command" each element, from the spinner to the button, telling the computer how it should update the user interface.
For basic application , it may be seem simple, easy to apply. But as the size of project or application increases it gets harder and tougher to maintain the application.
To handle such problem, React is developed.
Where in React, you won't be directly manipulate the UI. Instead, you declare what you want to show, and React figures out how to update the UI.
Example: It’s the driver’s job to get you there, and they might even know some shortcuts you haven’t considered!

A declarative approach to user interface design
To think in React, there are 4 steps given below:
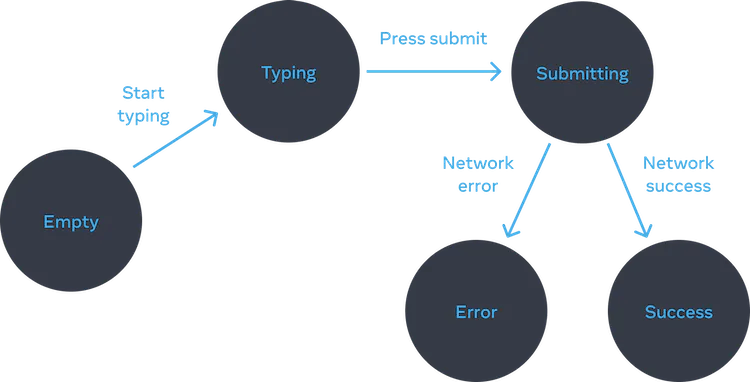
Step 1 :Identify your component’s different visual states
In this step, you need to visualize all the different "states" of the UI the user might see :
- Empty: Form has a disabled “Submit” button.
- Typing: Form has an enabled “Submit” button.
- Submitting: Form is completely disabled. Spinner is shown.
Step 2: Determine what triggers those state changes
To trigger the state updates in response, there are mainly two kinds:
- Human Inputs like Clicking a button, Typing in a field, Navigating a link.
- Computer inputs like a network response arriving, a timeout completing, an image loading.
Notice that human inputs often require event handlers!
Example: For the form you will need to change the state in response to a different inputs.
Step 3: With useState, you can represent the state in memory
Using useState, you can represent your component's visual state in memory. It's important to keep things simple: you want as few "moving pieces" as possible. There are more bugs when there is more complexity!
Start with the state that is absolutely necessary.
Step 4: Remove any non-essential state variables
Track only what is essential in the state content to avoid duplication. The benefit of refactoring your state structure is that it is easier to understand, reduces duplication, and avoids unintended consequences. Prevent instances where the state in memory doesn't represent any valid UI for the user. Connect the event handlers to set state
These are the 4 steps which will help in developing the component in React.
That’s pretty much it for this post. See you in the next one!